Assembling the ball coupling
 Mercedes-Benz recommends that you
have the ball coupling assembled at a
qualified specialist workshop. Only a
qualified specialist workshop has the
necessary specialist knowledge and tools
to carry out the work required. You could
otherwise incorrectly assemble the ball
coupling or tighten the nut with the
incorrect torque. This could lead to the ball
coupling and the ball coupling carrier
becoming detached while towing a trailer.
Mercedes-Benz recommends that you
have the ball coupling assembled at a
qualified specialist workshop. Only a
qualified specialist workshop has the
necessary specialist knowledge and tools
to carry out the work required. You could
otherwise incorrectly assemble the ball
coupling or tighten the nut with the
incorrect torque. This could lead to the ball
coupling and the ball coupling carrier
becoming detached while towing a trailer.
As a result, you could cause an accident.
Therefore, have the ball coupling
assembled at a qualified specialist
workshop.
If the assembled ball coupling has been
permanently mounted on the vehicle, have
the ball coupling regularly checked for
correct installation and torque at a qualified
specialist workshop.
 WARNING
The ball coupling can be damaged if the nut is
tightened on the ball coupling with the
incorrect torque. This could cause the trailer
to detach while driving and an accident could
occur as a result.
Therefore, please observe the following:
- do not exceed the maximum permitted
noseweight of the ball coupling, the trailer
coupling and the trailer tow hitch.
- when installing, always use a retaining ring
between the nut and the mounting surface
of the ball coupling carrier.
- if the assembled ball coupling has been
permanently mounted on the vehicle, have
the ball coupling regularly checked for
correct installation and torque at a qualified
specialist workshop.
- check that the thread under the nut is of
the correct length.
Mercedes-Benz recommends that you
only use ball couplings tested and
approved for use on Mercedes-Benz
vehicles. This helps to avoid damage to the
vehicle.
Observe the manufacturer's installation
instructions if you use a ball coupling other
than the one supplied.
 Also observe the height of the trailer
coupling and the trailer manufacturer's
instructions.
Also observe the height of the trailer
coupling and the trailer manufacturer's
instructions.
Depending on the height of the trailer
coupling, it is possible that the ball coupling
will have to be rotated by 180° on the ball
coupling carrier for correct installation. The
assembly is otherwise identical.
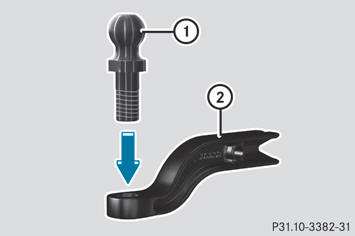
– Insert ball coupling 1 through the hole in ball coupling carrier 2 as far as it will go.
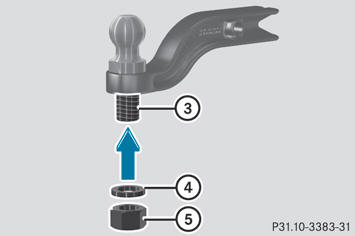
– Slide retaining ring 4 onto the thread of
ball coupling 3 as far as it will go.
– Screw on nut 5 as tightly as possible.
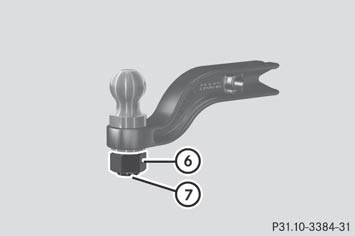
– With a torque wrench, tighten nut 6 to a
torque of 516 lb-ft (700 Nm).
– Check that projecting thread 7 has the
requisite length of 0.32 in (8 mm) beneath
nut 6.
– Check the assembled ball coupling for
correct installation.
See also:
Tire tread
WARNING
Although the applicable federal motor vehicle
safety laws consider a tire to be worn when
the tread wear indicators (TWI) become
visible at approximately 1/16 in (1.6 mm), we
recomm ...
Suspension: selective damping as standard
The standard steel suspension of the Mercedes-Benz CLS-Class is equipped with
a selective damping system. The shock absorbers adapt to the given driving
situation, reducing the damping forces auto ...
Before changing a fuse
•► Park the vehicle and apply the parking
brake.
•► Switch off all electrical consumers.
•► Remove the SmartKey from the ignition
lock.
The fuses are located in various fuse b ...