Mounting a new wheel
WARNING
Always replace wheel bolts that are damaged
or rusted.
Never apply oil or grease to wheel bolts.
Damaged wheel hub threads should be
repaired immediately. Do not continue to
drive under these circumstances! Contact an
authorized Mercedes-Benz Center or call
Roadside Assistance.
Incorrect wheel bolts or improperly tightened
wheel bolts can cause the wheel to come off.
This could cause an accident. Make sure to
use the correct wheel bolts.
WARNING
Only use genuine Mercedes-Benz wheel bolts.
Other wheel bolts may come loose.
Do not tighten the wheel bolts when the
vehicle is raised. Otherwise, the vehicle could
fall off the jack.
WARNING
Make sure to use the original length wheel
bolts when remounting the original wheel
after it has been repaired.
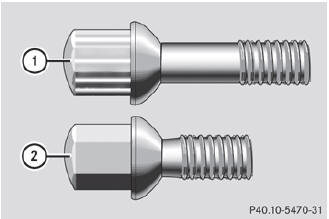
Wheel bolts for:
1 All alloy wheels and the "Minispare"
emergency spare wheel for alloy wheels
2 "Minispare" emergency spare wheel for
steel wheels
 Always use wheel bolts 1 to fit the
"Minispare" emergency spare wheel with
light-alloy wheel. Using other wheel bolts
when fitting the "Minispare" emergency
spare wheel with light-alloy wheel could
damage the brake system.
Always use wheel bolts 1 to fit the
"Minispare" emergency spare wheel with
light-alloy wheel. Using other wheel bolts
when fitting the "Minispare" emergency
spare wheel with light-alloy wheel could
damage the brake system.
Always use wheel bolts 2 to fit the "Minispare" emergency spare wheel with steel wheel. Using other wheels when fitting the "Minispare" emergency spare wheel with steel wheel could damage the brake system.
 Clean the wheel and wheel hub contact
surfaces.
Clean the wheel and wheel hub contact
surfaces.
To prevent damage to the paintwork, hold
the wheel securely against the wheel hub
while screwing in the first wheel bolt.
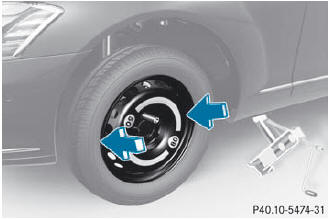
Slide the emergency spare wheel onto the
alignment bolt and push it on.
Tighten the wheel bolts until they are
finger-tight.
Unscrew the alignment bolt.
Tighten the last wheel bolt until it is fingertight.
See also:
Calling up a stored parking position
setting
•► Turn the SmartKey to position 2 in the
ignition lock.•► Adjust the exterior mirror on the frontpassenger
side with the corresponding
button•► Engage reverse gear.
The exter ...
Cleaning the sensors
Clean sensors 1 of the driving systems
with water, car shampoo and a soft cloth.
When cleaning the sensors with a
power
washer, maintain a distance between the
vehicle and the nozzl ...
Activation conditions
You can activate the HOLD function if:
- the vehicle is stationary.
- the engine is running.
- the driver's door is closed or your seat belt
is fastened.
- the p ...