Changing batteries
Batteries are required for the remote control and for the two sets of cordless headphones.
WARNING
Keep the batteries out of the reach of
children. Consult a doctor immediately if a
child should swallow a battery.
Do not dismantle, short-circuit or burn a battery.
Environmental note
Dispose of discharged batteries in an
environmentally responsible manner.
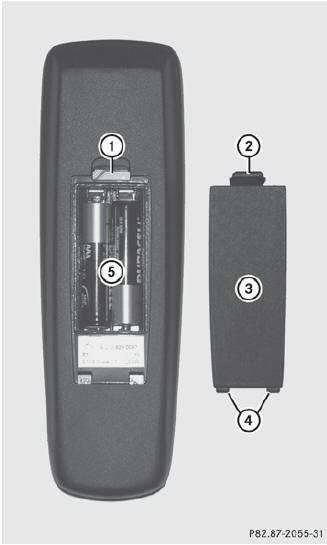
On the remote control
On the remote control
1 Battery tray
2 Catch tab
3 Battery tray cover
4 Retaining lugs
5 Batteries
The remote control contains 2 type AAA, 1.5 V batteries.
 To open the battery compartment: remove battery compartment cover 3
on
the back of the remote control.
To open the battery compartment: remove battery compartment cover 3
on
the back of the remote control.
To do so, press down retaining lug 2 and
take off battery tray cover 3.
Remove discharged batteries 5 from the
tray.
Insert the new batteries. Observe the
polarity markings on the batteries and
battery tray when doing so.
Left-hand battery: the positive pole (+) must face upwards.
Right-hand battery: the positive pole (+) must face downwards.
To close the battery compartment: insert battery compartment cover 3
starting with retaining lugs 4 into the
battery compartment and allow catch
tab 2 to engage in place.
On the cordless headphones
The battery compartment cover is located on the left headphone.
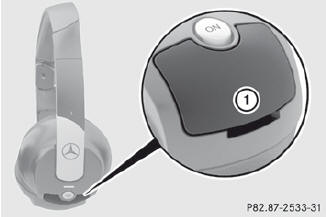
1 Battery tray cover
The wireless headphones contain 2 type AAA, 1.5 V batteries.
To open the battery compartment: flip
battery compartment cover 1 upwards.
As you do so, hold the left-hand side of the headphones as shown to prevent the batteries from falling out.
Remove the discharged batteries from the
tray.
Insert the new batteries. Observe the
polarity markings on the batteries and
battery tray when doing so.
Left-hand battery: The positive pole (+) must face upwards.
Right-hand battery The positive pole (+) must face downwards.
To close the battery compartment: press battery compartment cover
downwards until it engages into place.
If the batteries have been inserted correctly, the indicator lamp will light up green when the headphones are switched on.
See also:
Cornering light function
The cornering light function improves the illumination of the road over a wide
angle in the direction you are turning, enabling better visibility in tight bends,
for example. It can only be acti ...
Approach/departure angle
- Comply with the rules for off-road driving.
- Do not drive at an angle on slopes, inclines
or gradients, but instead follow the direct
line of fall. The maximum gradient-climbing
capabili ...
Blind Spot Assist
Important safety notes
Blind Spot Assist uses a radar sensor system
to monitor the areas on both sides of your
vehicle. It supports you from speeds of
approximately 20 mph (30 km/h). A warning ...