Rear seat head restraints
WARNING
For safety reasons, always drive with the rear
head restraints in the upright position when
the rear seats are occupied.
Keep the area around head restraints clear of
articles (e.g. clothing) to not obstruct the
folding operation of the head restraints.
WARNING
For your protection, drive only with properly
positioned head restraints.
Adjust the head restraint in such a way that it
is as close to the head as possible and the
center of the head restraint supports the back
of the head at eye level. This will reduce the
potential for injury to the head and neck in the
event of an accident or similar situation.
With a rear seat occupied, make sure to move
the respective head restraint up from the
lowest non-use position and have the
occupant adjust the head restraint properly.
Do not drive the vehicle without the seat head
restraints installed when the rear seats are
occupied. Head restraints are intended to
help reduce injuries during an accident.
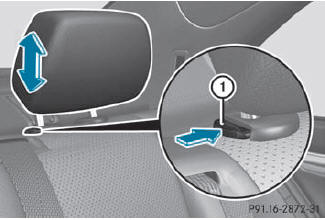
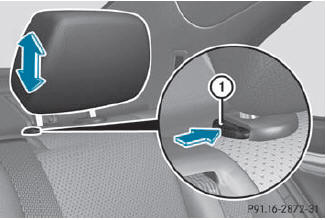
Adjusting the rear seat head restraint height
If the head restraint is fully lowered, it is necessary to press release catch 1.
 To raise: pull the head
restraint up to the
desired position.
To raise: pull the head
restraint up to the
desired position.
To lower: press release
catch 1 and push
the head restraint down until it is in the
desired position.
Removing and installing rear head restraints
WARNING
Occupants should only travel sitting on seats
which have the head restraints installed. In
the event of an accident, this reduces the risk
of injury for passengers seated in the rear
compartment.
Release the rear seat backrest
and fold it slightly forwards.
To remove: pull the head
restraint up to the stop.
Press release catch 1 and pull the
head restraint out of the guides.
To re-install: insert the
head restraint so that the notches on the bar are on the left when viewed in the
direction of travel.
Push the head restraint down until
you hear it engage in position.
Fold back the rear seat backrest
until it engages.
See also:
Preparing the vehicle
Your vehicle may be equipped with a
"Minispare" emergency spare wheel or
MOExtended tires (tires with run-flat
properties).
Vehicle preparation is not
necessary on
vehicles with ...
Cornering light function (Bi-Xenon headlamps)
Cornering light function (Bi-Xenon headlamps)
Switch off the lights.
Open the hood.
Turn housing cover 1
counter-clockwise and pull it out.
Turn bulb holder 2
counter-clockwise and pull ...
Vehicles with a TIREFIT kit
► Lift the cargo compartment floor up.
1 Jack
2 Towing eye
3 Ratchet wrench
4 Alignment bolt
5 Fuse allocation chart
6 Folding wheel chock
7 Lug wrench ...