Inflating the collapsible spare wheel
![]() WARNING
WARNING
Inflate the collapsible spare wheel only after the wheel is properly attached. Inflate the collapsible spare wheel using the tire inflation compressor before lowering the vehicle.
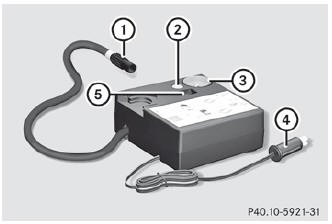
- Pull connector 4 and the air hose out of the housing.
- Remove the cap from the valve on the collapsible spare wheel.
- Screw union nut 1 on the air hose onto the valve.
- Make sure on/off switch 5 of the tire inflation compressor is set to 0.
- Insert plug 4 into the socket of the cigarette lighter () or into a 12 V power socket () in your vehicle.
- Make sure that the SmartKey is in position 1 () in the ignition lock.
- Press on/off switch 5 on the tire inflation compressor to I. The tire inflation compressor is switched on. The tire is inflated. Gauge 3 shows the tire pressure.
![]() Do not operate the tire inflation compressor for longer than eight minutes
at a time without a break. It may otherwise overheat.
Do not operate the tire inflation compressor for longer than eight minutes
at a time without a break. It may otherwise overheat.
The tire inflation compressor can be operated again once it has cooled down.
- Inflate the tire to the specified tire pressure. The specified tire pressure is printed on the yellow label of the emergency spare wheel.
- When the specified tire pressure has been reached, press on/off switch 5 on the electric air pump to 0. The tire inflation compressor is switched off.
- Turn the SmartKey to position 0 in the ignition lock.
- If the tire pressure is higher than the specified pressure, press pressure release button 2 until the correct tire pressure has been reached.
- Unscrew union nut 1 on the air hose from the valve.
- Screw the valve cap onto the collapsible spare wheel valve again.
- Stow plug 4 and the air hose in the lower section of the compressor housing.
- Stow the tire inflation compressor in the designated place in the vehicle.
See also:
Socket in the cargo compartment
– Lift up the cover of socket 1. ...
DISTRONIC displays in thespeedometer
When DISTRONIC is activated, one or
two segments in the set speed range light up.
For design reasons, the speed displayed
in the speedometer may differ slightly from
the speed set for DISTRON ...
Multifunction display
Values and settings as well as display
messages are shown in the multifunction
display.
1 Menu bar
2 Description field ...