Inflating the collapsible spare wheel
![]() WARNING
WARNING
Inflate the collapsible spare wheel only after the wheel is properly attached. Inflate the collapsible spare wheel using the tire inflation compressor before lowering the vehicle.
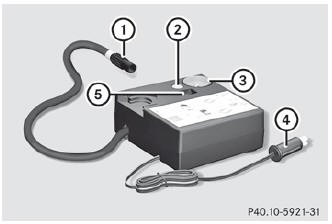
- Pull connector 4 and the air hose out of the housing.
- Remove the cap from the valve on the collapsible spare wheel.
- Screw union nut 1 on the air hose onto the valve.
- Make sure on/off switch 5 of the tire inflation compressor is set to 0.
- Insert plug 4 into the socket of the cigarette lighter () or into a 12 V power socket () in your vehicle.
- Make sure that the SmartKey is in position 1 () in the ignition lock.
- Press on/off switch 5 on the tire inflation compressor to I. The tire inflation compressor is switched on. The tire is inflated. Gauge 3 shows the tire pressure.
![]() Do not operate the tire inflation compressor for longer than eight minutes
at a time without a break. It may otherwise overheat.
Do not operate the tire inflation compressor for longer than eight minutes
at a time without a break. It may otherwise overheat.
The tire inflation compressor can be operated again once it has cooled down.
- Inflate the tire to the specified tire pressure. The specified tire pressure is printed on the yellow label of the emergency spare wheel.
- When the specified tire pressure has been reached, press on/off switch 5 on the electric air pump to 0. The tire inflation compressor is switched off.
- Turn the SmartKey to position 0 in the ignition lock.
- If the tire pressure is higher than the specified pressure, press pressure release button 2 until the correct tire pressure has been reached.
- Unscrew union nut 1 on the air hose from the valve.
- Screw the valve cap onto the collapsible spare wheel valve again.
- Stow plug 4 and the air hose in the lower section of the compressor housing.
- Stow the tire inflation compressor in the designated place in the vehicle.
See also:
Off-road
Important safety note
WARNING
The COMAND navigation system may direct
you to off-road routes that your vehicle may
not be capable of traversing through without
damaging your tires, wheels or ...
General notes
The Active Driving Assistance package
consists of DISTRONIC PLUS (Y page 169),
Active Blind Spot Assist (Y page 202) and
Active Lane Keeping Assist (Y page 205). ...
Floormat on the driver's side
WARNING
Whenever you are using a floormat, make sure there is enough clearance and that
the floormat is securely fastened.
The floormat should always be securely fastened using the fastening ...