Programming the integrated garage door opener on the rear-view mirror
Programming
WARNING
Only press the transmitter button on the
integrated garage door opener if there are no
persons or objects present within the sweep
of the garage door. People could otherwise be
injured by the movement of the door.
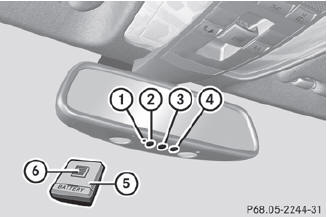
Integrated garage door opener on the rear-view mirror
Garage door remote control 5 is not part of this integrated garage door opener.
 To achieve the best result,
insert new
batteries in garage door remote control
5 before programming.
To achieve the best result,
insert new
batteries in garage door remote control
5 before programming.
 Before programming for the first
time, clear
the memory of the integrated garage door
opener.
Before programming for the first
time, clear
the memory of the integrated garage door
opener.
Turn the SmartKey to position 2 in
the
ignition lock.
Press and hold one of transmitter
buttons 2 to 4 on the integrated garage
door opener.
Indicator lamp 1 starts to flash yellow
after a short period.
Indicator lamp 1 flashes yellow
immediately after the transmitter button
has been stored for the first time. If the
transmitter button has already been
programmed, indicator lamp 1 does not
flash yellow until 10 seconds have elapsed.
Release the transmitter
button.
Point transmitter button 6 of
garage door
remote control 5 towards the transmitter
buttons on the rear-view mirror at a
distance of 2 to 8 inches (5 to 20 cm).
The distance required between
garage
door remote control 5 and the integrated
garage door opener depends on the system
of the garage door drive. You might require
several attempts. You should test every
position for at least 25 seconds before
trying another position.
Press and hold transmitter
button 6 on
garage door remote control 5 until
indicator lamp 1 lights up green.
Programming is complete if indicator
lamp 1 lights up or flashes green.
Release transmitter button 2, 3 or
4 on
the integrated garage door opener and the
transmitter button on garage door remote
control 6.
If indicator lamp 1 lights up red:
Repeat the programming procedure
for the
transmitter button. When doing so, vary the
distance between the garage door remote
control and the rear-view mirror.
If the indicator lamp flashes
green after
successful programming, the garage door
system is operating on a rolling code. After
programming, you must synchronize the
garage door opener integrated in the rearview mirror with the receiver of the
garage
door system.
Synchronizing the rolling code
Your vehicle must be within range of the garage or gate opener drive. Make sure that neither your vehicle nor any persons/objects are present within the sweep of the door or gate.
Observe the safety notes when performing the rolling code synchronization.
Turn the SmartKey to position 2
in the
ignition lock.
Press the programming button of the
door
or gate drive (see the door or gate drive
operating instructions, e.g. under
"Programming of additional remote
controls").
You now normally have 30 seconds
to
initiate the next step.
Press the previously programmed
transmitter button of the HomeLink®
integrated garage door opener repeatedly
in succession until the door opens.
The rolling code synchronization is then
complete.
Notes on programming the remote control
Canadian radio frequency laws require a "break" (or interruption) of the transmission signals after broadcasting for a few seconds.
These signals may not therefore last long enough for the integrated garage door opener to recognize the signal during programming.
Comparable with Canadian law, some U.S.
garage door openers also have a built-in "interruption".
If you live in Canada or have difficulties programming the garage door opener (regardless of where you live) when using the programming steps (see above), proceed as follows:
Press and hold one of
transmitter
buttons 2 to 4 of the integrated garage
door opener.
Indicator lamp 1 starts to flash yellow
after a short period.
Release the transmitter button.
Press transmitter button 6 of the
garage
door remote control and hold for two
seconds, then release for two seconds,
then press again and hold for two seconds.
Repeat this sequence on transmitter
button 6 of the garage door remote
control until indicator lamp 1 is green.
Repeat the process if indicator lamp 1
turns red.
Continue with the other programming
steps (see above).
Problems when programming
If you are experiencing problems
programming the integrated garage door
opener on the rear-view mirror, take note of
the following instructions:
• check the transmission frequency of
garage door remote control 5 (usually
found on the reverse side of the remote
control).
The integrated garage door opener is
compatible with devices that can be
operated with units in a frequency range of
280 to 390 MHz.
• change the batteries in garage door remote
control 5. This increases the probability
that garage door remote control 5 will
send a strong and precise signal to the
integrated garage door opener on the rearview
mirror.
• when programming, hold garage door
remote control 5 at different distances
and angles from the transmitter button that
you are programming. Try different angles
at a distance between 2 and 12 inches (5
to 30 cm) or the same angle at varying
distances.
• if another remote control for the same
garage door drive is available, repeat the
same programming steps with this remote
control. Before you perform the steps of the
operation, make sure that there are new
batteries in the garage door remote
control.
• note that some remote controls only
transmit for a limited amount of time (the
indicator lamp on the remote control goes
out). Press the remote control button again
before it stops transmitting.
• align the antenna cable of the garage door
opener unit. This can improve signal
reception/transmission.
See also:
System self-test
The indicator lamp illuminates
when you:
- turn the SmartKey to position 1 or 2 in the
ignition lock
- on vehicles with KEYLESS-GO, press the
Start/Stop button once or twice
If an adult o ...
Important safety notes
WARNING
To help avoid personal injury during a collision
or sudden maneuver, exercise care when
storing objects in the vehicle. Put luggage or
cargo in the trunk if possible.
Do not pile lug ...
Maintenance
The Service and Warranty Booklet describes
all the necessary maintenance work which
should be done at regular intervals.
Always have the Service and Warranty
Booklet with you when you bring the ...