Inflating the collapsible spare wheel
![]() WARNING
WARNING
Inflate the collapsible spare wheel only after the wheel is properly attached. Inflate the collapsible spare wheel using the tire inflation compressor before lowering the vehicle.
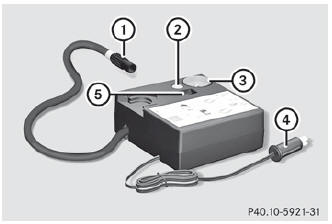
- Pull connector 4 and the air hose out of the housing.
- Remove the cap from the valve on the collapsible spare wheel.
- Screw union nut 1 on the air hose onto the valve.
- Make sure on/off switch 5 of the tire inflation compressor is set to 0.
- Insert plug 4 into the socket of the cigarette lighter () or into a 12 V power socket () in your vehicle.
- Make sure that the SmartKey is in position 1 () in the ignition lock.
- Press on/off switch 5 on the tire inflation compressor to I. The tire inflation compressor is switched on. The tire is inflated. Gauge 3 shows the tire pressure.
![]() Do not operate the tire inflation compressor for longer than eight minutes
at a time without a break. It may otherwise overheat.
Do not operate the tire inflation compressor for longer than eight minutes
at a time without a break. It may otherwise overheat.
The tire inflation compressor can be operated again once it has cooled down.
- Inflate the tire to the specified tire pressure. The specified tire pressure is printed on the yellow label of the emergency spare wheel.
- When the specified tire pressure has been reached, press on/off switch 5 on the electric air pump to 0. The tire inflation compressor is switched off.
- Turn the SmartKey to position 0 in the ignition lock.
- If the tire pressure is higher than the specified pressure, press pressure release button 2 until the correct tire pressure has been reached.
- Unscrew union nut 1 on the air hose from the valve.
- Screw the valve cap onto the collapsible spare wheel valve again.
- Stow plug 4 and the air hose in the lower section of the compressor housing.
- Stow the tire inflation compressor in the designated place in the vehicle.
See also:
Dashboard fuse box
Do not use a pointed object such as a
screwdriver to open the cover in the
dashboard. You could damage the
dashboard or the cover.
– To open: pull cover 1 outwards in the
direction of ...
Adjusting the head restraint height electrically
To adjust the head restraint height: slide
the switch for head restraint adjustment
up or down in the direction of
the arrow. ...
Cleaning the steering wheel and gear or selector lever
Thoroughly wipe with a damp cloth or use
leather care agents that have been
recommended and approved by Mercedes-
Benz. ...