Changing batteries
Batteries are required for the remote control and for the two sets of cordless headphones.
WARNING
Keep the batteries out of the reach of
children. Consult a doctor immediately if a
child should swallow a battery.
Do not dismantle, short-circuit or burn a battery.
Environmental note
Dispose of discharged batteries in an
environmentally responsible manner.
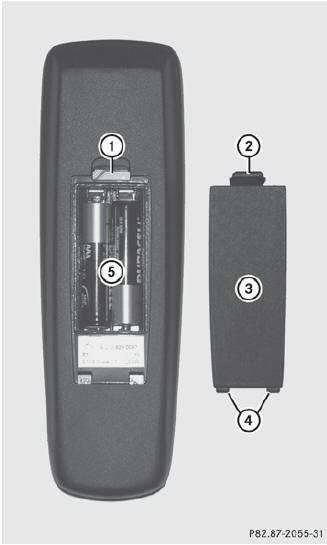
On the remote control
On the remote control
1 Battery tray
2 Catch tab
3 Battery tray cover
4 Retaining lugs
5 Batteries
The remote control contains 2 type AAA, 1.5 V batteries.
 To open the battery compartment: remove battery compartment cover 3
on
the back of the remote control.
To open the battery compartment: remove battery compartment cover 3
on
the back of the remote control.
To do so, press down retaining lug 2 and
take off battery tray cover 3.
Remove discharged batteries 5 from the
tray.
Insert the new batteries. Observe the
polarity markings on the batteries and
battery tray when doing so.
Left-hand battery: the positive pole (+) must face upwards.
Right-hand battery: the positive pole (+) must face downwards.
To close the battery compartment: insert battery compartment cover 3
starting with retaining lugs 4 into the
battery compartment and allow catch
tab 2 to engage in place.
On the cordless headphones
The battery compartment cover is located on the left headphone.
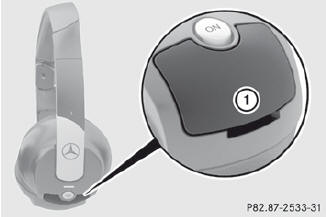
1 Battery tray cover
The wireless headphones contain 2 type AAA, 1.5 V batteries.
To open the battery compartment: flip
battery compartment cover 1 upwards.
As you do so, hold the left-hand side of the headphones as shown to prevent the batteries from falling out.
Remove the discharged batteries from the
tray.
Insert the new batteries. Observe the
polarity markings on the batteries and
battery tray when doing so.
Left-hand battery: The positive pole (+) must face upwards.
Right-hand battery The positive pole (+) must face downwards.
To close the battery compartment: press battery compartment cover
downwards until it engages into place.
If the batteries have been inserted correctly, the indicator lamp will light up green when the headphones are switched on.
See also:
Emergency call
Important safety notes
A license agreement must exist in order to activate the mbrace service. Ensure
that your system is activated and ready for use, and press the
MB Info call button to regi ...
Connecting AUX equipment
AUX drive
The AUX drive jacks are located on the CD/DVD drive on the right next to the
CD/DVD
eject button.
Displaying AUX
The AUX display jacks are on the side of the
screen.
Audio and vide ...
Hill start assist
Hill start assist helps you when pulling away
forwards or in reverse on an uphill gradient.
It holds the vehicle for a short time after you
have removed your foot from the brake pedal.
This give ...