Instruction labels for tires and load
![]() WARNING
WARNING
Do not overload the tires by exceeding the
specified load limit as indicated on the Tire
and Loading Information placard on the
driver's door B-pillar. Overloading the tires
can overheat them, possibly causing a
blowout. Overloading the tires can also result
in handling or steering problems, or brake
failure.
Two instruction labels on your vehicle show the maximum possible load.
(1) The Tire and Loading Information placard on the B-pillar on the driver's side. The Tire and Loading Information placard shows the maximum permissible number of occupants and the maximum permissible vehicle load. It also contains details of the tire sizes and corresponding pressures for tires mounted at the factory.
(2) The vehicle identification plate is on the B-pillar on the driver's side. The vehicle identification plate informs you of the gross vehicle weight rating. It is made up of the vehicle weight, all vehicle occupants, the fuel and the cargo. You can also find information about the maximum gross axle weight rating on the front and rear axle.
The maximum gross axle weight rating is the maximum weight that can be carried by one axle (front or rear axle). Never exceed the maximum load or the maximum gross axle weight rating for the front or rear axle.
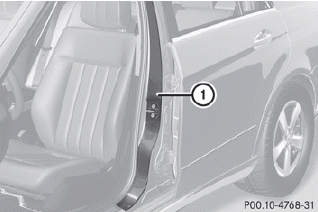
B-pillar (example: Sedan)
1. B-pillar, driver's side
See also:
Opening the tailgate from inside the
vehicle (Wagon with a folding bench
seat)
Inside of tailgate
•► To unlock the tailgate: slide locking
catch 2 to the right.•► To open: pull the top of handle 1.•► Swing the tailgate upwards.•► To lock the tailgate ...
Problems with the occupant classification system
Problem
The indicator lamp illuminates and
remains illuminated. The person on the front-passenger seat:
has the weight of a typical adult
has been determined by the system not to be a child. ...
Opening and closing
You can continue to operate the sliding
sunroof after switching off the engine or
removing the SmartKey from the ignition
lock. This function is available for up to five
minutes or until the d ...