Programming the integrated garage door opener on the rear-view mirror
Programming
![]() WARNING
WARNING
Only press the transmitter button on the integrated remote control if there are no persons or objects present within the sweep of the garage door. People could otherwise be injured by the movement of the door.
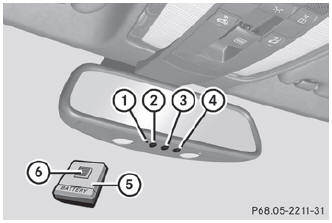
Integrated remote control in the rear-view mirror Garage door remote control 5 is not part of the garage door opener.
![]() To achieve the best result, insert new batteries in garage door remote control
5 of your garage door drive before programming.
To achieve the best result, insert new batteries in garage door remote control
5 of your garage door drive before programming.
- Erase the memory of the integrated remote control () before programming it for the first time.
- Turn the SmartKey to position 2 in the ignition lock.
- Press and hold one of transmitter buttons 2 to 4 on the integrated remote control.
After a short time, indicator lamp 1 will start flashing. It flashes approximately once per second.
![]() Indicator lamp 1 flashes immediately the first time that the transmitter button
is programmed. If this transmitter button has already been programmed, indicator
lamp 1 will only start flashing at a rate of once a second after 20 seconds have
elapsed.
Indicator lamp 1 flashes immediately the first time that the transmitter button
is programmed. If this transmitter button has already been programmed, indicator
lamp 1 will only start flashing at a rate of once a second after 20 seconds have
elapsed.
- Continue to hold the transmitter button.
- Point transmitter button 6 of garage door remote control 5 towards the transmitter buttons on the rear-view mirror at a distance of 5 to 20 cm.
- Point transmitter button 6 of garage door remote control 5 towards the transmitter buttons on the rear-view mirror at a distance of 2 to 12 inches (5 to 30 cm).
![]() The distance between garage door remote control 5 and the integrated garage
door opener depends on the system of the garage door drive. You might require several
attempts. You should test every position for at least 20 seconds before trying another
position.
The distance between garage door remote control 5 and the integrated garage
door opener depends on the system of the garage door drive. You might require several
attempts. You should test every position for at least 20 seconds before trying another
position.
- Keep transmitter button 6 on garage door remote control 5 pressed until indicator lamp 1 starts to flash rapidly. The programming has been successful if indicator lamp 1 flashes rapidly.
- Release transmitter buttons 2, 3 or 4 on the integrated remote control and transmitter button 6 on the garage door remote control.
If indicator lamp 1 goes out after approximately 90 seconds and has not flashed rapidly:
- Release transmitter buttons 2, 3 or 4 on the integrated remote control and transmitter button 6 on the garage door remote control.
- Repeat the programming procedure. When doing so, vary the distance between the garage door's remote control and the transmitter buttons in the rear-view mirror.
![]() If the garage door system works with a rolling code, you must synchronize the
remote control integrated in the rear-view mirror with the garage door system receiver
after programming.
If the garage door system works with a rolling code, you must synchronize the
remote control integrated in the rear-view mirror with the garage door system receiver
after programming.
You will find further information in the garage door opening system's operating instructions, e.g. the sections on "Synchronizing the transmitter" or "Registering a new transmitter". You can also call the hotline mentioned above.
Notes on programming the remote control
Canadian radio frequency laws require a "break" (or interruption) of the transmission signals after broadcasting for a few seconds. Therefore, these signals may not last long enough for the integrated remote control to recognize the signal during programming. Comparable with Canadian law, some U.S. garage door openers also have a built-in "interruption".
If you live in Canada or have difficulties programming the garage door opener (regardless of where you live) when using the programming steps (see above), proceed as follows:
- Press transmitter button (2, 3 or 4) and hold it down during the following steps until the setup has been completed successfully.
- At the same time, press transmitter button 6 of the garage door remote control for two seconds, then release it for two seconds, then press it again for two seconds.
- Repeat this sequence on transmitter button 6 of the garage door remote control until the frequency signal has been saved.
- If the setup procedure is successful, indicator lamp 1 flashes once slowly and goes out after a few seconds.
- Continue with the other programming steps (see above).
Problems when programming
If you have problems when programming the integrated remote control, please note the following:
- check the transmitter frequency of garage door remote control 5 (which can usually be found on the rear of the remote control). The integrated remote control is compatible with devices that operate at frequencies between 280 and 390 MHz.
- replace the batteries in garage door remote control 5. This increases the likelihood of garage door remote control 5 sending a strong and precise signal to the integrated remote control in the rear-view mirror.
- when programming, hold garage door remote control 5 at varying distances and angles from the transmitter button which you are programming. Try different angles at a distance between 2 and 12 inches (5 to 30 cm) or the same angle at varying distances.
- if there is another garage door remote control for the same garage door drive, perform the programming steps again using that remote control. Before performing these steps, make sure that new batteries have been inserted in the garage door remote control.
- align the antenna cable of the garage door opener unit. This can improve signal reception/transmission.
See also:
Search & Send
Points to observe before use
To use Search & Send, your vehicle must
be equipped with mbrace and a navigation
system. You must also have an mbrace
service subscription.
"Search & ...
Dialing a number from the phone book
If your mobile phone is able to receive calls,
you can search for and dial a number from the
phone book in COMAND at any time.
•► Copy the telephone book of the mobile
phone into the audi ...
Lights
Display messages about LEDs:
This display message will only appear if all LEDs have failed.
Display messages
Cornering Lamp
Left or Cornering
Lamp Right
Possible causes/consequences an ...