Vehicle level
Important safety notes
Your vehicle regulates its height automatically. All-round self-leveling ensures the best possible suspension and constant ground clearance, even with a laden vehicle.
When you drive fast, the vehicle is lowered automatically to improve driving safety and to reduce fuel consumption.
The following vehicle levels are possible:
- normal
- raised: the vehicle is raised by about 0.80 in
(20 mm) when compared with the normal
level
- lowered: the vehicle is lowered by about
0.40 in (10 mm) when compared with the
normal level
The "Normal" and "Raised" vehicle levels can be set manually.
The "Lowered” vehicle level is set automatically:
- at speeds above 70 mph (113 km/h)
- if you have selected "Sports tuning"
Setting the vehicle level
Select the "Normal" setting for normal road surfaces and "Raised" for driving with snow chains or on particularly poor road surfaces.
Your selection remains stored even if you remove the SmartKey from the ignition lock.
![]() WARNING
WARNING
To help avoid personal injury, keep hands and
feet away from wheel housing area, and stay
away from under the vehicle when lowering
the vehicle chassis.
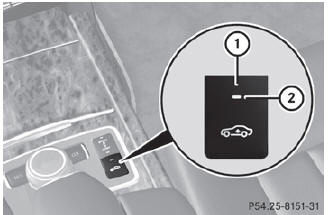
Setting raised level
•► Start the engine.
If indicator lamp 2 is not lit:
•► Press button 1.
Indicator lamp 2 lights up. The vehicle height is adjusted to raised level.
The Vehicle rising message appears in the display.
The "Raised level" setting is canceled if you:
- drive at speeds above approximately
75 mph (120 km/h)
- drive about 3 minutes at speeds above
50 mph (80 km/h)
The "Raised level" remains active when you are not driving within these speed ranges.
Setting the normal level
•► Start the engine.
If indicator lamp 2 is lit:
•► Press button 1.
Indicator lamp 2 goes out. The vehicle is adjusted to normal level.
See also:
Operating the on-board computer
The on-board computer is activated as soon
as you turn the SmartKey to position 1 in the
ignition lock.
You can control the multifunction display and
the settings in the on-board computer using
...
Window curtain air bags
The window curtain air bags enhance the level
of protection for the head, but not chest or
arms, of the vehicle occupants on the side of
the vehicle on which the impact occurs.
The window curta ...
General information
Operational readiness of the navigation
system
The navigation system must determine the
position of the vehicle before first use or
whenever operational status is restored.
Therefore, you may ...