LATCH-type (ISOFIX) child seat anchors in the rear
WARNING
Children that are too large for a child restraint
must travel in seats using normal seat belts.
Position shoulder belt across the chest and
shoulder, not face or neck.
In order to attain the correct seating position
for children weighing over 41 lb (18 kg), it may
be necessary to use a booster seat until they
reach a height where a normal lap/shoulder
seat belt lies properly across their bodies
without the need for a booster seat.
Install the child restraint system according to
the manufacturer's instructions.
The child restraint system must be installed
firmly on both brackets.
An incorrectly installed child restraint system
can come loose in the event of an accident,
causing the child to be severely or fatally
injured.
Child restraint systems/child restraint
retaining brackets that are damaged or have
suffered damage due to an impact must be
replaced.
LATCH-type (ISOFIX) is a standardized securing system for specially designed child restraint systems on the rear seats. Securing rings for two LATCH-type (ISOFIX) child restraint systems are installed on the left and right of the rear seats.
Secure non LATCH-type (ISOFIX) child restraint systems using the vehicle's seat belt system. Always install child restraint systems according to the manufacturer's instructions.
 When installing the child
restraint system,
make sure that the seat belt for the center
seat does not get trapped. Otherwise, the
seat belt could be damaged.
When installing the child
restraint system,
make sure that the seat belt for the center
seat does not get trapped. Otherwise, the
seat belt could be damaged.
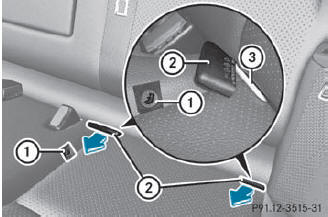
Vehicles without rear-seat through-loading facility
Installation instructions 1 indicate the installation location of securing rings 3.
 Remove covers 2 from securing rings
3
by pulling in the direction of the arrow.
Remove covers 2 from securing rings
3
by pulling in the direction of the arrow.
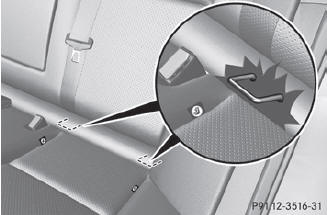
Vehicles with rear-seat through-loading facility
Install the LATCH-type (ISOFIX)
child
restraint system. Comply with the
manufacturer's instructions when
installing the LATCH-type (ISOFIX) child
restraint system.
See also:
Extending/retracting the roller sunblind
Make sure that the roller
sunblind can
move freely. Otherwise, the roller sunblind
or other objects could be damaged.
Turn the SmartKey to position 2
in the
ignition lock.
To extend o ...
Roadside Assistance button
Press and hold Roadside Assistance
button 1 for more than two seconds. This initiates a call to the Mercedes-Benz
Customer Assistance Center. The indicator lamp in Roadside Assistance but ...
Setting the airflow
You can set the airflow separately for the
driver’s and front-passenger side.
Select left airflow 3 or right airflow 5 by
turning the COMAND controller and
press to confirm.
To adjust th ...